My Black Friday beauty finds.

Image

20121126-094455.jpg

So while many were standing on line for 60″ tv’s I was out grabbing all the Black Friday beauty deals that I was looking forward to.

20121126-094725.jpg
My first stop was Sephora. They had these $10 sets that one would be a fool to pass up. The plus for me was two of those $10 sets included things that I needed/ wanted.

The first set was the Sephora Instant moisture kit.
The need from this kit : The instant depuffing roll-on gel for my eyes. I love it. It reduces the little puffiness I would normally get from not getting 8 hours of sleep. This helps to make it look like I do.
What it also included:
Supreme cleansing foam. It’s for the face and the eyes ( not all face washes are sensitive to the eyes).
An Instant moisturizer that provides long-lasting moisture , suites all skin types and contains antioxidants. I’ve been using it in the morning for yhe past three days so far so good. No greasiness just radiance.

20121126-094955.jpg
The second set , Boscia be brilliant set.
What I needed from the kit: Boscia luminizing black mask peel. It boosts skin clarity by removing dirt and impurities while refining your pores. Plus it makes my skin feel softer than a baby’s ass after I peel it off.
What it also included:
Purifying cleansing gel:It’s a a sulfate free cleanser that removes makeup and deep cleans while maintaining the natural moisture barrier of the skin…I’ve been using it for the past three days and my skin feels cleaner than it did when using my normal cleanser.
Oil free nightly hydration: a nightly moisturizer. It’s oil free, controls shine, hydrates , refines and minimizes appearance of your pores. All while you sleep.
Green tea blotting linens: infused with green tea extract, the woven sheet absorbs oil without disturbing your makeup.

20121126-095342.jpg
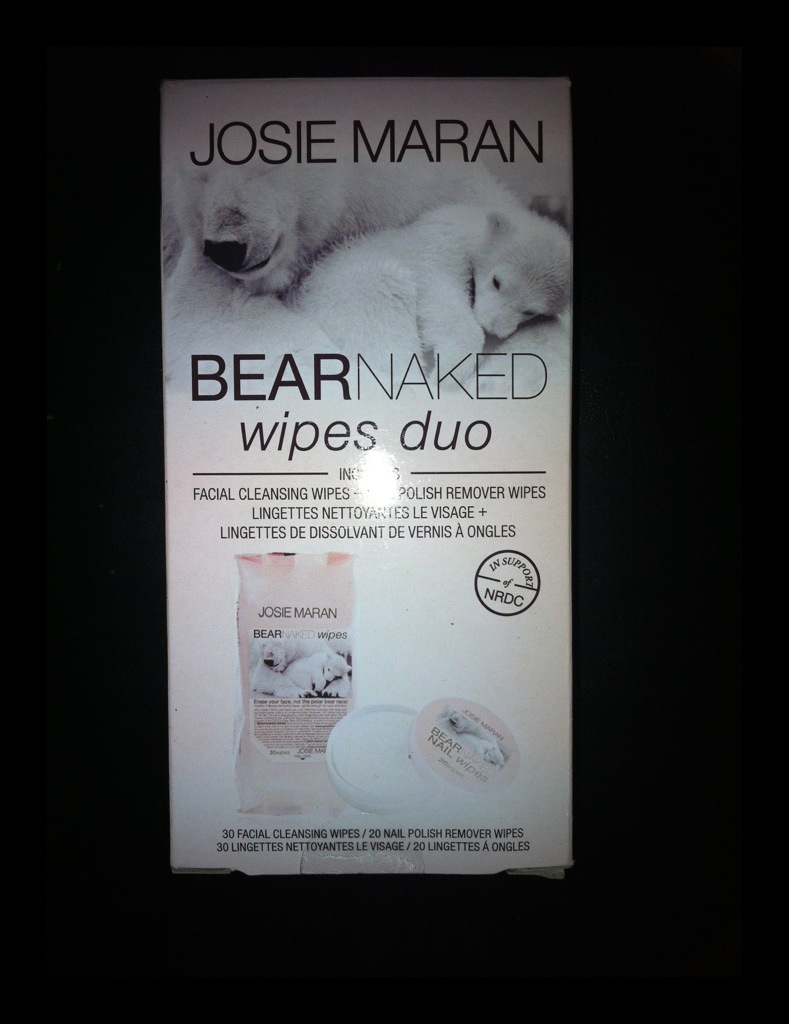
Third set, Josie Maran Bear Naked wipes duo. This set included facial cleansing wipes that contains aloe vera, cucumber and vitamin E. it removes makeup dirt and impurities while soothing the skin. It’s gentle enough to be used on the eye area, it’s biodegradable and it’s super soft. I used them last night and they get the job done.
It also includes nail polish remover wipes that are acetone free and contains argan oil for your cuticles. It’s says one remover pad for all 10 nails. That’s not the case if you’re wearing glitter nail polish. I used about three of them.
From Sephora in times sq I went down to the lower east side to the Obsessive Compulsive Cosmetics ( OCC) boutique to pick up a couple lip tars. I love the lip tars from OCC. The color is super saturated, last like a lip stick and glides on like a gloss. It’s very light weight but all you need is a little. Less than a pea size. What I love most is that they’re easy to mix to create your own custom color. Lip tars contain hemp oil, pepper mint oil and Vitamin E. it’s also 100% vegan and cruelty free.
I picked up two lip tars and with my purchase I got a free lip tar so I got their gold metallic lip tar called Triptych from their new Metallurgy collection. I also got a sample of their lip tar in RX. Check em all out below.

20121126-101153.jpg
OCC lip tar in Interlace.

20121126-102339.jpg
New metallic lip tar in Triptych

20121126-105221.jpg
OCC lip tar in Harlot

20121126-102718.jpg
OCC lip tar in RX ( I’m so in love with this, the sample I got just won’t so I have to go back for it!).

If you can’t make it down to the boutique just purchase them online: http://www.occmakeup.com

-Keisha taught you 😉

Autmn ombré nails!

Image

20121119-133144.jpg

One thing I love to do around the holidays is fun nail art that suits the occasion. With Thanksgiving just a few days away, I figured I’d give you guys a fun nail tutorial that will make passing the peas look a little more glamorous.

Things you’ll need:
1.) paper plate
2.) cosmetic wedge applicator ( foundation sponge)
3.) tweezers ( I use a silver clip in my photo)
4.) Any tan or light mustard colored nail polish
5.) orange nail polish ( nothing too neon)
6.) Gold glitter nail polish.

20121119-135847.jpg
Apply your base coat and two coats of your tan nail polish. (I only used one coat because the color was very opaque). Then let it completely dry before going on the the next step.

20121119-140107.jpg
Take your orange nail polish and make a little puddle in the center of the paper plate ( be generous so the paint doesn’t dry too fast).

20121119-140438.jpg
Cut a piece of the cosmetic wedge and using your tweezers to grasp the sponge, dip it lightly into the puddle of orange polish.
Then starting at the tip of your nail dab up to the middle of your nail. You want to keep most if the color at the tip and let the rest fade out to the middle.
Do this to all of you nails and then repeat for a second coat so it doesn’t look to sheer.

20121119-141318.jpg
Once your done with your ombré, apply one coat of gold glitter nail polish. Make sure there isn’t too much polish on your brush. You don’t want the glitter to cover the ombré. We just want enough for a little sparkle.

20121119-141624.jpg
Finish with your favorite top coat and let your nails shine brighter than grandmas fancy china. Enjoy!

-Keisha taught you

Follow me on Instagram @keeshology

20121119-145258.jpg

Two faced.

Image

20121029-194017.jpg

Halloween is a the day that makeup artists and those who love the holiday can let their imagination run wild! I’ve been seeing a lot of skull tutorials/pictorials and decided to do my own rendition. It wouldn’t be right if I didn’t share it with you. Here’s how I did it.

20121029-194227.jpg
1.) I used a white eyeliner pencil to map out where the white ( your bone structure) makeup will go on half of my face.

20121029-194354.jpg
2.) Using a a cosmetic wedge ( foundation sponge ) I filled in my whole face with Ben Nye Clown White makeup. For tighter areas I used a small concealer brush to fill in the white. Then I set it the makeup with Makeup Forever translucent HD powder. You can use baby powder if you don’t have translucent powder.

3.) I used a black eye kohl pencil to map out where the black makeup would be, pretty much where you have no bone. To help, feel out your face. Pretty much the eye socket, just under the jaw bone and some parts in your temple

20121029-195112.jpg
4.) Next, using the same black eyeliner pencil, you want to draw a line from the corner of you mouth the where you last tooth would be. Then draw the teeth by making a few lines starting at your lip and finishing along your cheek.

20121029-195335.jpg
5.) I used black chroma line from MAC to fill in the black areas, using a small concealer brush. Then I used my fine pointed eyeliner brush to draw in little Y’s at the top and bottom lines the are the teeth. To give it more of the shape of an actual tooth and look realistic.

20121029-195928.jpg
6.) I used a small shader brush and black eye shadow to set the black areas and create more of a contoured along the jaw, eye sockets, my temples and the inside of my lip. Then I took my fine eyeliner brush with some black chroma line and created little cracks.

20121029-200233.jpg
The finished look of the skill side.

20121029-200449.jpg
For the other side of my face I did a glam drag look ( you can do your most glamorous makeup look on the other side. It trips people out lol).

20121029-200744.jpg

Happy Halloween!

-Keisha taught you 🙂 .

20121029-203208.jpg
Products used:
Ben Nye clown white makeup
MAC Eye Kohl in Smolder
Rimmel London soft Kohl pencil in Pure White
MAC matte eyeshadow in Carbon
Makeup Forever translucent HD powder
MAC 209 eyeliner brush

These are a few of my favorite things

Image

20121022-194821.jpg

People always ask me about the things I use as far as beauty products. From moisturizers down to my lip gloss. Here are a few of my favorite things that I pretty much use everyday.

20121022-195152.jpg
I Love Nivea Soft Face and body cream. I use it as my moisturizer for my face in the morning and at night before bed. It contains Vitamin E and jojaba oil, so it leaves my skin feeling soft and looking radiant . I have combination skin so my T zone gets oily and the rest of my face can get really dry, especially during this time of season and the cream seems to be the perfect balance for my skin.

20121022-205047.jpg
I never used eye cream, eye gel or what ever else they have out there on the market because I never felt I needed it. That was until someone said to me ” you have really nice skin but you look kind of dark under the eyes”. That was a “Oh hell no” moment for me. That’s when I went to Sephora and got their depuffing roll-on gel. It depuffs and helps with dark circles. I apply this under my eyes and on my eyelids, then I tap it into my skin using my ring fingers until it absorbs. I’ve noticed I’m not dark under the eyes like I used to be. It’s more even with my skin. Perfect for my no makeup days.

20121022-205810.jpg
Korres pomegranate toner for oily to combination skin does wonders for me. It takes away the excess dirt and oil my cleanser didn’t get rid of. I use it after washing my face and before moisturizing. I noticed I don’t look as greasy as I used to when I wake up in the morning and when wearing makeup I don’t have powder my shiny areas until the end of my work day.

20121022-213846.jpg
I will say I am the makeup artist who is guilty of not applying primer on my face before putting on foundation. I do it for my clients but haven’t been doing it for my self. It’s good to prime before you apply your makeup. It’s fills in lines and helps from makeup getting deep into your pores. But I’ll admit that I’m lazy and trying to keep my makeup routine within a 5 minute frame because I have to rush out the door causes me to skip a few steps. I started adding Fresh Face primer into my routine. It’s not heavy, doesn’t make my face look or feel oily and sets my makeup very well.

20121022-214639.jpg
I LOVE my EOS lip balm. It keeps my lip super smooth and moisturized. Gives a nice sheen when worn alone and perfect before applying lipgloss or lipstick. It also doesn’t have that nasty taste if you accidently lick your lips.

20121022-214946.jpg
I just started using MAC Face and Body foundation and I love it. It’s great for those who don’t need full coverage and just want a sheer foundation that makes the skin look dewy. It’s water proof and has a lot of emollients ( moisturizers) in it. I still set it with a powder because I have combo skin but it gets the job done. It’s also great for those who have dry skin.

20121022-215345.jpg
Wet&Wild mega liner is the best inexpensive liquid opaque eyeliner EVER! I use it all the time on my clients and my self. It dries fast and stays true to color and doesn’t get that gray look after a few hours. For a drug store brand it doesn’t get any better than this.

20121022-220035.jpg
Givenchy Noir Couture mascara.
All of my other mascaras have been pushed to the back burner for this one. It lengthens, doesn’t flake, curls my lashes and makes them really black.

20121022-220414.jpg
MAC lip glass in Lust
I’ve tried so many nudes. They were either too brown or too white. Finally I found the perfect one. I wear it almost every day and its always in my bag just incase I get tired of the lip color I’m wearing by the end if the day.

Feel free to try any of these products and let me know your feed back!

-Keisha taught you 😉

Fashion Week: Beauty Trends Spring 2013.

Image

20120925-085958.jpg

Some of your top designers are giving you new looks to try next spring and some are bringing that old thing back but with a twist. Here are some of my favorites:

20120925-090314.jpg
At Michael Kors the liner floated up from the lash line to the crease. Giving you a pop of color on a fresh face.

20120925-090501.jpg
At FENDI, not only did the collection inspire the makeup look, they were apart of the makeup! They cut thin strips of fabric used in the collection to create this three color liner look on the bottom lash line. I would not suggest trying this at home, but with three good eye kohl pencils I’m sure you can achieve the look.

20120925-090947.jpg
At Donna Karen they opted for a bright pink eye and nude lip. It’s a new take on the simple smokey eye.

20120925-091448.jpg
At Burberry Prorsum the girls walked the runway in metallic trench coats and bright red lips.

20120925-095647.jpg
DKNY kept it clean, fresh, and dewy with the no makeup makeup look. For one who loves color, to me nothing tops the look of flawless looking skin.

-Keisha taught you 😉

Keisha does FNO!

Image

20120909-220233.jpg

Last week I took to the streets for Fashion’s Night Out. A night when those who have a love for fashion and amazing style step out in one of their best looks. Walking through the streets of manhattan they pose for bloggers, make statements and sip champagne in some of their favorite stores.

20120909-221656.jpg
My night started when I came out of the train station in SOHO to see MUEHLEDER displaying her new collection. It was sexy, edgy and modern. Most of all I LOVED the makeup. Dewy luminous skin, red eyeshadow and gold lipstick complimented each look.

20120909-230040.jpg
I stopped by the Billionaire Boys Club store and my little sis Kaya was there sporting this 1920’s fingerwave hairstyle with a pearl finish brown lipstick. She’s giving me fall all the way.

20120909-230931.jpg
This trio turned the heads of everyone that passed them including mine. Not only were they dressed fabulously, they were sweethearts. Nothing’s more beautiful to me than humble people with style.

20120909-231608.jpg
I then shopped into the UGG store where Dj C.Devone was on the 1’s and 2’s. She had everyone doing the Dougie. And she did it in style by dressing up her denim shirt with a gold metallic flared skirt, a chunky gold chain and a soft makeup look.

20120909-232350.jpg
While waiting for champagne Christine caught my eye with a bright matte red lip.

20120909-232518.jpg
And they way she mixed her patterns. Those floral pants… LOVE!

20120909-232812.jpg
Couldn’t get enough of her shimmering green eyeshadow and wispy lashes.

20120909-233119.jpg
Her makeup matched the green wavy pattern on her fly jumpsuit.

20120909-233445.jpg
The effortlessly chic Tanisha was my partner in crime for that evening in her paisley print linen shirt and high waisted drop crotch pants.

20120909-234212.jpg
Her smokey eye and nude lip were on point, a perfect accessory for her look.

20120909-234404.jpg
My night ended with a fashion zombie. It wouldn’t be Fashion’s Night Out if it didn’t .

-Keisha taught you 😉
Follow me on instagram and twitter : @keeshology

The Look: Colored Brows

Image

20120902-232659.jpg

Fashion week is upon us and all I can think about is what kind of makeup look will I be doing for Fashion’s Night Out. Flipping through some of my September issues and looking at beauty photos on tumblr, I got inspired by the makeup looks in Prada’s and Chanel’s Fall 2012 collections. It was all about the brows. And if you know me you know I love a good brow.
So I decided to test out this look on the lovely Tanisha.

20120904-151428.jpg

I used Lime Crime eyeshadow primer on the whole brow with a white eyeliner to draw in the shape and fill in her brows. Then I went over it with a cobalt blue loose pigment shadow. The ending results…bright defined brows.
I plan on doing a similar look with brows to match my blue hair.

20120902-235745.jpg

So stay tuned for pics of my look from Fashion’s Night Out along with pics of any beautynistas ( yes I said BEAUTYNISTAS) that catch my eye.

-Keisha taught you 😉

Red, Hot and Vampy

Image

20120827-112658.jpg

I am sad to say that summer is coming to an end and fall is slowly approaching. But don’t worry, there are some HOT beauty trends for fall 2012 that will have you heating up the chilly streets of NYC. To start off on the right foot we are going to tackle the Red Lip! This trend was seen down a few runways, from Sportmax to Victor&Rolf and from Victoria Beckham to Rochas. Some went for a very bold matte red,some went dark like red wine and some went vampy and glossy. I know some women are scared to take one such a beauty statement because they feel it won’t look good on them. Well that’s because you just need the right shade that suits you. And trust me there is a shade for everyone.
When wearing red lipstick, whether dark or bright, it’s best to keep the rest of your makeup simple. But load up on mascara. You always want your eyes to pop. With dark patent lips I like to keep from looking too goth by wearing a pop of color ( a clutch, a blazer, a necklace etc). So this fall be bold, daring and most of all turn heads.

20120827-111114.jpg

20120827-111206.jpg

20120827-111246.jpg

20120827-112517.jpg

-Keisha taught you 😉

Brow Me!

Image

20120814-152226.jpg

Brows are making statements. They’re taking over the runways, editorial spreads and the fashionistas are showing em off on the streets. It’s all about the full brow ladies. Here I’m going to show you how to achieve a sleek full brow wether you just need a little filling in because you already have full brows or If you have thin brows and want them full.

Step 1:Brush your eyebrows with and eyebrow brush so that the hairs are in place and so that you can see the shape.

20120814-171339.jpg

Step 2: Using an angled brush and eyeshadow (Try to stay in the brown family. Try a really dark brown if you have really dark hair. Avoid using black eyeshadow. Can look too intense and not so natural for everyday) follow the shape of your eyebrow along the brow bone.

20120814-213146.jpg

Step 3: Using the eyebrow brush again you want to brush the shadow into the rest of the brow. This gives you a natural look instead of that hard line. You want to brush up to brush in the shadow.

20120814-213336.jpg

Step 4: Using concealer ( I used a concealer one shade lighter than my normal shade) and a angled or thin square flat brush follow the shape of your brow just under the hairs.

20120814-213823.jpg

Step 5: Go ahead and blend out where you put the conclealer with your foundation.

20120814-215410.jpg

20120814-215500.jpg

Finished look. Brows that are making statements! 😉

20120814-220854.jpg

The Golden Champ

Image

The Golden Champ

I got inspired by our gold medal all around champ Gabby Douglas. First off I want to say congratulations Gabby! You were amazing and you made history!
I’m sure we all have noticed Gabby’s slight smokey eye which she does by just lining her lower and upper lashline with black eyeliner and loading up on mascara. So I decided to do my own rendition and of course I’m going to show you how I did it.

Step 1: Apply a eyeshadow primer. This will help grasp the eyeshadow and help it last longer.

20120806-094117.jpg

Step 2: Apply a gold eyeshadow that has a satin or frost finish by dabbing the eyeshadow onto the lid from lash line to crease. I used MAC eyeshadow in All That Glitters.

20120806-095025.jpg

Step 3: Dab a matte black eyeshadow on the outter corner of the eyelid and the crease. Blending towards the inner corner of the eye. I used MAC eyeshadow in Carbon.

20120806-100539.jpg

Step 4: Apply a liquid eyeliner along the upper lash line. I used Wet and Wild Mega liquid eyeliner in black.

20120806-100900.jpg

Step 5: Apply a black eyeliner to bottom lash line and water line. Then take a small eyeshadow brush or a smudge brush, sweeping back and forth, smudging out the liner. I used MAC eyeliner in Smolder. Add black mascara to top and bottom lashes.

20120806-101824.jpg

The finished look: a sexy smokey eye that can be worn on and off the mats. 🙂

20120806-102916.jpg

Products used:

20120806-104544.jpg